We have been experimenting in our house to find the "perfect" removable blackout blind and after adjusting the "recipe" slightly we have refined our 3rd edition of the DIY blackout blind  . Because we are renting we can't have permanent fixtures such as shutters so we have made do with this DIY option. Our house has PVC (plastic) window frames which are ideal to stick the Velcro onto the frame as any gluey residue can be removed and cleaned when we leave the property. The description is pretty basic and it's a fairly simple solution to create a blacked out room for super duper sleep quality at a reasonable price. :)
Materials used:
- Blackout material (measurement will depend on the size of your window I would recommend getting more in case you make a mistake) We used this material.
- Velcro, make sure to get the hook and loop (the fuzzy and rough). One of these needs to have a sticky back and one plain that can be sewn. You can get both the hook and loop sticky, however we found the Velcro doesn't stick THAT well to the material for long periods and with repeated use.
- Scissors, sewing machine, tape measure, pen/ pencil
Method:
1.First things first measure your window. Add about 10cm to your measurements just to be safe and to add an extra bit of blackout protection to the edges of your blind. If necessary cut it out of scrap cotton first and see if it fits your window then use this as a template/pattern. Measure again just to be sure. Cut your material.
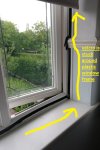
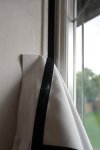
2. Next I cut the sticky-backed velcro (loop) to fit all around the window frame, this was about 6 pieces, and stuck it to the plastic window frame (see pics below).
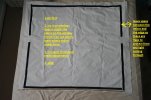
3. I then cut the hook velcro so it was the same size as the loop pieces and arranged them on the blackout material roughly 5 cm in and pinned, be aware that if you put the pins in the fabric and then make adjustments, it will leave tiny holes from the pins that light can get through. You could patch them up with tape or fabric patches.
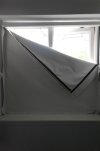
I kept trying it out on the window until I found a perfect fit and all the pieces of velcro matched up. It's quite tedious but worth it as you really don't want to have to unpick the sewing once it's done.
4. Sew the Velcro to the blackout material all around the edges. I increased the tension on my sewing machine slightly and didn't need to use a special needle. Just sew right on the edge of the velcro- no need to go through the middle.
. Because we are renting we can't have permanent fixtures such as shutters so we have made do with this DIY option. Our house has PVC (plastic) window frames which are ideal to stick the Velcro onto the frame as any gluey residue can be removed and cleaned when we leave the property. The description is pretty basic and it's a fairly simple solution to create a blacked out room for super duper sleep quality at a reasonable price. :)Materials used:
- Blackout material (measurement will depend on the size of your window I would recommend getting more in case you make a mistake) We used this material.
- Velcro, make sure to get the hook and loop (the fuzzy and rough). One of these needs to have a sticky back and one plain that can be sewn. You can get both the hook and loop sticky, however we found the Velcro doesn't stick THAT well to the material for long periods and with repeated use.
- Scissors, sewing machine, tape measure, pen/ pencil
Method:
1.First things first measure your window. Add about 10cm to your measurements just to be safe and to add an extra bit of blackout protection to the edges of your blind. If necessary cut it out of scrap cotton first and see if it fits your window then use this as a template/pattern. Measure again just to be sure. Cut your material.
2. Next I cut the sticky-backed velcro (loop) to fit all around the window frame, this was about 6 pieces, and stuck it to the plastic window frame (see pics below).
3. I then cut the hook velcro so it was the same size as the loop pieces and arranged them on the blackout material roughly 5 cm in and pinned, be aware that if you put the pins in the fabric and then make adjustments, it will leave tiny holes from the pins that light can get through. You could patch them up with tape or fabric patches.
I kept trying it out on the window until I found a perfect fit and all the pieces of velcro matched up. It's quite tedious but worth it as you really don't want to have to unpick the sewing once it's done.
4. Sew the Velcro to the blackout material all around the edges. I increased the tension on my sewing machine slightly and didn't need to use a special needle. Just sew right on the edge of the velcro- no need to go through the middle.